hello everyone!
this blog has moved to a new one, makeupandmasonjars.blogspot.com. I will be posting there from now on. Thank you!

"No Amount Of Make-up Can Mask An Ugly Heart " - Kevyn Aucoin
Monday, November 5, 2012
Tuesday, June 26, 2012
Some Summer Tips 'n Tricks
My makeup routine is definitely different in the summer than in the winter, and yours should be too! Summer means heat, meaning sweat, meaning your makeup routine should adjust accordingly. Here are a few tips and tricks to beat the heat.
Face
1) Skip the foundation.
I rarely slap on a full face of foundation on a hot summer day, unless I'm majorly breaking out. Instead I reach for primer, a tinted moisturizer, and concealer. I love Smashbox Photofinish Light primer. It's for oily skin and doesn't add a layer of silicone over my face like most primers do. I've been loving mark. tinted moisturizer as well. When I use tinted moisturizer, I skip my regular moisturizer because otherwise I'd just be an oily mess.
You can also still use your foundation, but just use it like a concealer and spot it on where necessary. I also always use a mattifying powder, like Maybelline's Dream Matte powder. I've been using it for years and it's great.
2) Bronzer.
A lot of people think that just because they have a tan means they shouldn't use bronzer. False!! Bronzer is a fantastic way to amp up your look and give a beautiful glow. I've recently been using my NYX When a Leopard Gets a Tan bronzer with my kabuki brush and giving my face a light dusting. You can also use matte bronzers (my favorite being Benefit's Hoola bronzer, but a great cheap alternative is NYC Sunny bronzer) to contour your face.
3) Highlight.
Highlighting powders and creams can cost a lot, but using a champagne eyeshadow can work wonders as well. Recently I've been using a CoverGirl eyeshadow single in Champagne. It's great because I can dab a bit in the inner corners of my eyes to make them stand out, but I also use it on my cheek bones to give my face a glow.
Highlighting can be tricky, because you don't want to use anything too sparkly. Some people don't mind it, but I hate sparkly. Instead opt for shimmer or sheen, which is finer and won't look like chunks of sparkles on your face.
This simple, and often over-looked, step can be just the thing for the sun-kissed glowy look the summer is perfect for.
Eyes
1) Waterproof mascara.
The last thing you want is to get all sweaty and have raccoon eyes. Opt for a waterproof mascara to keep it put all day long. If you can't find a waterproof mascara that you like (often waterproof formulas are different than regular formulas), just use your regular mascara and put a THIN coat of waterproof over your regular.
2) Long-wearing creams are your best friend.
I've been reaching for long-wearing cream eyeshadows a lot this summer. They're so easy to just swipe on and go and not have to worry about primer and all of that. I ADORE Urban Decay's 24/7 Eyeshadow Pencil in Sin. Its the perfect pick-me-up for all over the eyes- the lid, brow, and inner corners. And it stays all day! Definitely worth the money.
A more affordable option are the Maybelline Color Tattoos. Just make sure to apply it in a thin layer, otherwise it may crease during the day.
3) White/flesh-toned eyeliner on the waterline.
This makes you look awake and refreshed without much effort and it's not too noticeable. Woot!
Lips
1) Use lipstick like a stain.
Bold lips are definitely in, but using a vibrant lipstick can be hard upkeep. Summer is great for sheer color, so try dabbing your lipstick on with your finger. This will give a more stained, yet noticeable effect, without as much maintenance.
2) Skip the stick; use gloss.
I'm honestly not much of a lipgloss girl, but this summer I've been loving how easy glosses are. I've been using my lipgloss from theBalm in Tutti my Fruitti almost every day.
Hope this helps!! Thanks for viewing!
~Beth
Tuesday, June 5, 2012
Soft Date Look
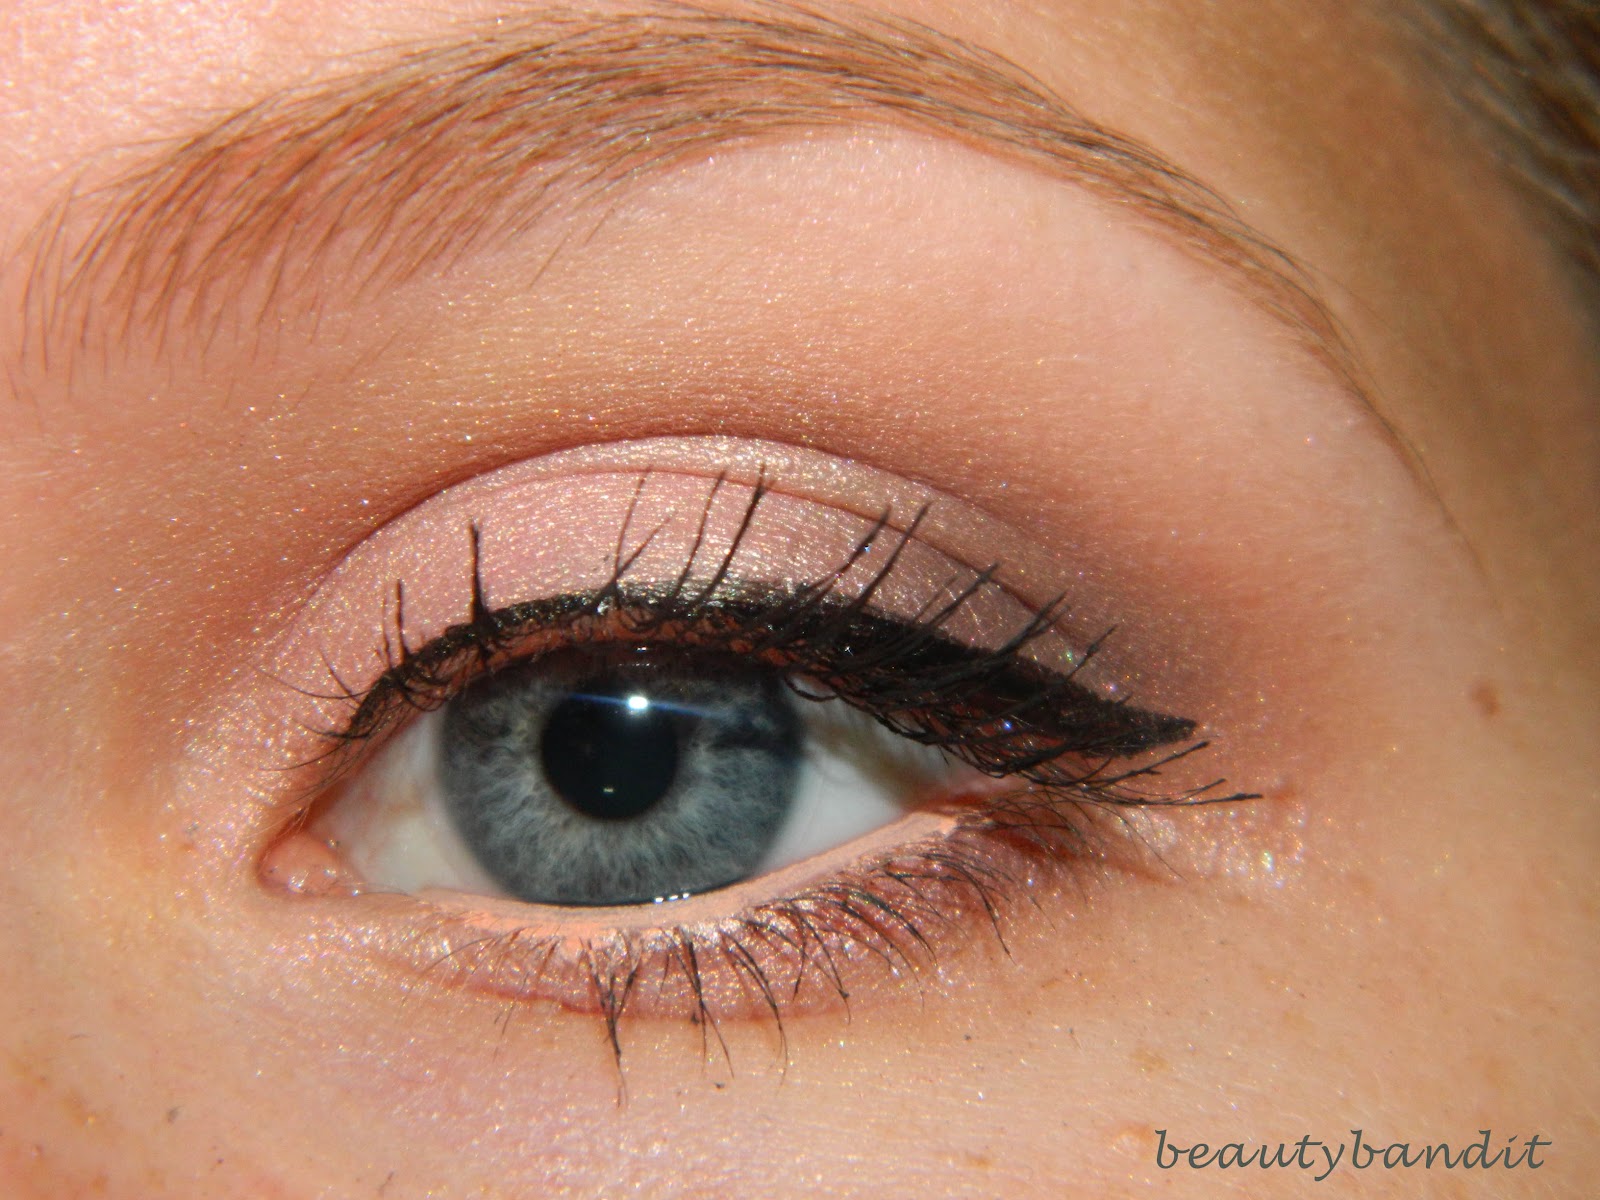
I've really been loving playing around with peachy colors this summer. I was doing so when I came up with this eye look, which I think would be perfect for a date or other event where you want to look a little more dressed up than usual, but not over the top for an event like prom or something of that nature.

The key to this look is to blend, blend blend!
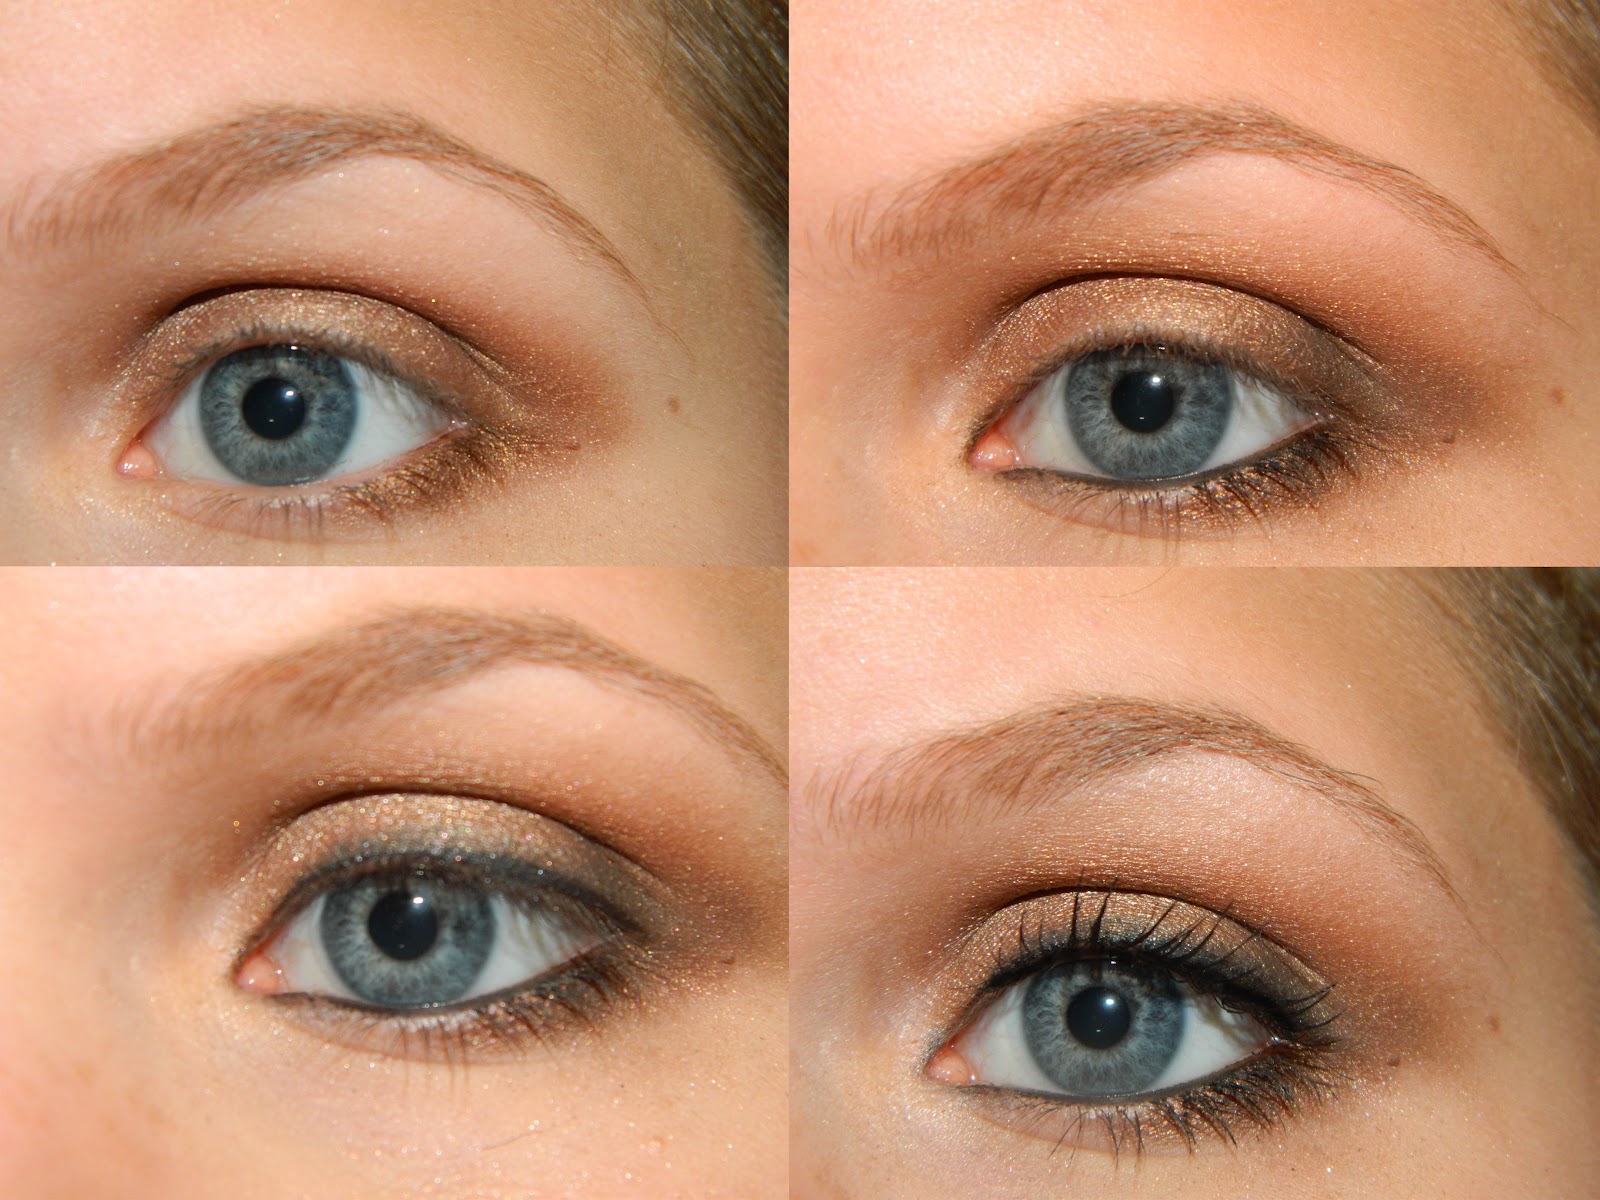
1) Start off with a clean, primed eye.
2) Take a light, peachy-pink color and pack this onto the lid.
3) Take a darker peach color and apply this on the outer corner of your upper and lower lid and into your crease.
4) Using a fluffy brush, take a shadow that is just slightly darker than your skin color. Blend this into the crease with the peachy color.
5) Take a deep purple shadow. Using a pencil brush, apply this to the very outer edges of your lid and very lightly to your outer lower lash line. Again, take your fluffy brush and blend this out.
6) Use a white or flesh-toned eyeliner on your waterline. Using a black liquid liner, line your upper lash line. Create a slight wing at the end if you so choose.
7) Curl your lashes and apply mascara, and you're done!
Thanks for viewing!
~Beth
Summer Colored French Tips
Again, I am just in love with the Essie Summer Collection, and can't choose just one color to wear. I saw a manicure like this on pinterest a while back, and decided to try it myself. I haven't had the best of luck with doing french manicures on myself, but I decided to try it again. This time I think it turned out pretty good! I think the trick is to let the base color dry absolutely completely before applying the tip guides (like for a couple of hours). Enjoy!

As a base I again used Revlon's Colorstay in Bare Bones. This manicure is the same color scheme as the last toothpick manicure I did. For some reason I'm diggin' it.
Then, after letting the base to dry for about 3-4 hours, I applied french manicure tip guides. These are pretty cheap at the drug store, but you can also use tape if you don't have any.
From there on out, it's pretty self-explanatory. Apply the color at the tip of the nail. I suggest applying it from the tip guide on out to the edge of the nail. I did two coats of each tip before removing the guide, but remove the guide as quickly as possible after the second coat (this will help eliminate the guide taking the polish with it).


From left to right: Essie Fear or Desire, Essie Bikini So Teeny, Essie Off The Shoulder, Essie Mojito Madness, Zoya Pippa
Thanks for viewing!
~Beth
Monday, June 4, 2012
Toothpick Splatter Nails
So I recently got this cute little set of four mini Essie nail polishes from their summer collection, and I just couldn't decide which color I wanted to wear. So I ended up using the toothpick technique to create a splatter-like pattern on my nails using all four of the colors. I really like how this turned out, but I think the pictures don't do the effect justice. Enjoy!

First I painted my nails with a sand color (LOVE this color- Revlon Colorstay in Bare Bones). I used a sand color to stick with the summer-beachy theme of the summer collection from Essie. But you can use whatever base you'd like.
From there I just put a dot of polish on a palette, took a toothpick, and swiped the color from the corner of my nail outwards. Then I just repeated the steps with each of the colors.
From bottom of the nail to top I used Bikini So Teeny, Mojito Madness, Fear or Desire, and Off the Shoulder. I topped it off with NYC Matte Me Crazy matte topcoat.
 |
| Before the matte topcoat |
 |
| With matte topcoat |
Thanks for viewing!
~Beth
Wednesday, May 23, 2012
Bronze Summer
I love bronze looks in the summertime. Here is just one variation of the classic look. Enjoy!

First, to prime my eyes and have a bronze base, I used Maybelline Color Tattoo in Bad to the Bronze.

Next I wet a brush and used a golden e.l.f. pigment all over the lid.

I used this Physician's Formula palette (the bronzed blue eyes one) a lot for this look. I used the light champagne color as a highlight and on the very ball (highest roundest point) on my lid.

Using a fluffy blending brush, I mixed a couple of light pinky-purple colors (this is the coastal scents 88 palette) and placed this in the crease. Using a fluffy brush makes the color go on a lot more sheer. I really like this step, because it makes your eyes kind of look like a sunset.

Using a pencil brush, I used the bronze color on the outer corners of my eyes and along the lower lash line.

I then lined my waterline with a white pencil. I lined my upper lid with a wet eyeliner brush and used the darkest brown color in the Physician's Formula palette. I then curled my lashes and applied a black mascara.

For lips I used Sonia Kashuk lipstick in Sheer Bronzey Nude and topped it off with mark. Gloss On Lipgloss in Sand.

For the rest of the face I skipped foundation and just used concealer. For this look make sure to use a bronzer and highlighter to bring out a sun-kissed glow!
Hope you liked this! Thanks for viewing!
~Beth
Monday, May 21, 2012
Aaaand the winner is...
Hi everyone!
First I'd like to apologize for my lack of activity on here. It was just finals at school and I had to pack and move and unpack and all of that jazz. I should be having some fun stuff up soon!
Second, I have the winner of the giveaway. This was a random selection giveaway, not a contest (just to be clear). Thank you everyone for your input- it means a lot! The winner of the giveaway is fancyfashionss! If you could get back to me with your name and address via e-mail then I can mail you your prize :) Thanks again everyone!
Wednesday, May 9, 2012
Finals Survival Makeup
I know that finals are over for most schools, but mine are just beginning. Around this time I find myself wearing a lot of sweatpants, throwing my hair in ponytails, and paying a lot less attention to makeup. But if I completely neglect how I look, sometimes I end up just feeling gross and that does not help studying. So here's five steps, along with some tips and tricks, to help to keep feeling put together without much effort.

1) Concealer is my best friend. Especially when I'm not getting much sleep. I recently bought Urban Decay's 24/7 Concealer Stick and it's pure love. I just wipe it under my eyes, around my nose, and on the stress breakout i'm incurring.
2) Curl your lashes and apply mascara. This step alone can make you look awake and attentive. Use a waterproof mascara to prevent it from melting, but remember to use eye makeup remover to take it off at night!
3) Swipe on either a nude or white eyeliner on your waterline. This will really open up your eyes.
4) Use a light bronzer on your cheeks to look like you actually go outside instead of being cooped up in your room or library. I used NYX Tango with Bronzer in When Leopard Gets A Tan.
5) Tinted lip balm/lip stain. This stuff is low maintenance but will bring life back to washed-out lips. I used The Balm's Stainiac in Beauty Queen.
Other tips:
- you can use a white or champagne eyeshadow and just dot it on your inner corner of your eye and on the ball of your lid (the most round part). This will give a nice highlight to your eyes.
- drink water to avoid stress breakouts
- use a mattifying setting powder to absorb oil. Also keep those little oil absorbtion sheets around, because you may touch your face a lot more out of stress, which will cause a shiny face.
Thanks for viewing!
~Beth
Sunday, May 6, 2012
Pollock Splatter Nails
Here are some Jackson Pollock inspired splatter nails. There are a couple techniques you can use to do this manicure, but I used one I found by The Polishaholic. Enjoy!

First paint your nails with a base color. I used Revlon Colorstay in Bare Bones.
Then, cover your cuticles and surrounding finger with tape (this will help a LOT with cleanup).
Put a dollop of your first color on your palette (in my case, I used a plastic lid). I suggest putting a nickel to a quarter-sized amount.
Take a straw and dip it in the polish. Blow the color over your nail through the straw (using the side not covered in polish :]). It may take a couple of dips in the polish until there's enough on there to blow onto the nail. You may also have to use somewhat forceful breaths.
Continue with the next color. I suggest kind of doing a light colors first then darker colors sequence.
Take the tape off. Use a Q-tip and nail polish remover and clean up your fingers.
I used a matte top coat just because I like the effect, but you can use whatever top coat you'd like.
Thanks for viewing!
~Beth
Saturday, May 5, 2012
Love: Spring and Summer Lips
I really love myself a nice lip color. Here are my top picks for Spring/Summer 2012!
 |
| In the picture I am wearing Urban Decay lipliner in Naked with Revlon Colorbust in Soft Nude Nude lips are nice because they are low-maintenance and you can easily fake a fully lip by lining slightly outside your natural lip line and it's not too noticeable. My top nude choices from left to right: Urban Decay in Naked (liner), Make Up For Ever in 1C (liner), NYX Soft Matte Lip Cream in Stockholm, Revlon Colorburst in Soft Nude, MAC in Creme d' Nude. |
 |
| In the picture I am wearing MAC So Chaud. It looks more red in the picture, but in real life it is more of a burnt orange |
I wore orange lips all the time last summer, and I still haven't gotten enough of this color.
Favorite oranges: MAC Entertain Me (liner), NYX Femme, Revlon Kiss Me Coral, MAC So Chaud
 |
| I know, I spelled fuchsia wrong in the pic. woops! On the left I am wearing Viva Glam Nicki, on the right I am wearing Revlon's Fuchsia Fusion |
A nice pink lip is always a classic.
Favorite light pinks: Victoria's Secret in Pulse, MAC Viva Glam Nicki
Favorite fuchsias: Revlon Fuchsia Fusion, MAC Girl About Town, Revlon Lip Butter in Lollipop
 |
| In the pic I am wearing Revlon Berry Haute with Revlon Lilac Pastelle on top |
Recently I've been digging purple-y or lilac-y lips. I haven't done too much research on this color but I have a few items that I really like.
Favorite purples: Revlon Berry Haute, Revlon Lip Butter in Gumdrop, Revlon Super Lustrous Lipgloss in Lilac Pastelle

Finally, I have just recently begun to like lip stains. Most of the ones I have tried just make my lips look very dry and the color sinks into the creases. But I just found one- Stainiac by TheBalm in Beauty Queen that I love! It's low maintenance and make my lips have a perfect hint of color.
Thanks for viewing!
~Beth
Thank You and GIVEAWAY!
Hi all!
I just wanted to say thank you to everyone who has supported me through this blog. It has really meant a lot to me. I recently hit 20,000 views and 25 followers, and I think it's time to celebrate! In honor of these milestones, I am holding a giveaway of a couple of my favorite e.l.f. and mark. products. The winner will receive all of the items in the picture.
 |
| e.l.f. eyeshadow brush e.l.f. lucious liquid lipstick in babylips e.l.f. brightening eye color in butternut e.l.f. natural lash kit mark. snap to it mini mark. eyeshadow in whisper mark. eyeshadow in tiki mark. juice gems in papaya mark. glow baby glow hook up in m. powerment peach mark. samples |
All you have to do is subscribe to my blog (by hitting the join button on the right) and comment this picture or message/e-mail me of an idea that you'd like me to do on the blog. It could be nails, hair, makeup...anything beauty related! The giveaway will be from today, May 5 (Happy Cinco de Mayo!) until Wednesday, May 16.
I know some people might consider these milestones not really that big, but to me it's huge. I never expected even 1,000 views or 10 followers. So thank you all!
Tuesday, May 1, 2012
Trend: Neon Lids
Whether it's clothes, shoes, nails, or makeup, neon is definitely in this spring! Here I did a neon yellow lid using Pop Beauty's Neon Lid palette. I used NYX jumbo pencil in milk beneath the yellow to make it really pop. I've been loving seeing neon lids with a winged liner, so I did that as well. Enjoy!

I like this look because it looks a bit mod to me. It's also super simple as little blending is required. The key is to find a vibrant, pigmented shadow. This is great for a night out, or if you're adventurous, during the day.
Thanks for viewing!
~Beth
Thursday, April 26, 2012
Acid Wash Nails
For these nails I took the idea of distressed nails and made it to look like jeans! Enjoy!

1) Paint your nails with a blue color. I used Revlon Colorstay in Indigo Night.
MINI RAVE- this nail polish is great! After one coat (first pic) the nails where almost opaque. If I applied a thicker coat I bet that's all I would've needed if I was just wearing this color.
2) Apply another coat of the blue. This will help to not get to your bare nail as fast.
3) Apply a white color on top of the blue. I used Sinful Colors in Snow Me White.
4) Dip a Q-tip in nail polish remover and gently swipe away the white. Be careful not to get to your bare nail.
5) Top coat! I used OPI Nail Envy Matte because it gives a nice natural finish- I didn't want something super glossy or completely matte.
And you're done!
Thanks for viewing!
~Beth
Monday, April 23, 2012
Distressed Nails
Last night I had some time on my hands (no pun intended), and decided to do a distressed nail look. It's easy and has endless possibilities. Enjoy!

Basically all you do is paint your nails several different colors in different layers. You can apply some colors to only some parts of the nail to create a less uniform look.
After you've done several layers, take a Q-tip that is soaked (and I mean soaked) in nail polish remover. Gently rub it across your nail to reveal the different layers of the polish. Remember what color you did first so when you start to see it you don't keep rubbing (because then you'll just take all your polish off).
Product List:
Zoya Pippa
China Glaze Papaya Punch
China Glaze Starboard
Revlon Indigo Night
POP Ultraviolet
Wet N Wild Casting Call/Rose Sage
Sinful Colors Unicorn
Thanks for viewing!
~Beth
Friday, April 20, 2012
Jennifer Lawrence Hunger Games Premiere Makeup
Jennifer Lawrence looked absolutely stunning at the premiere of the Hunger Games, and my roommate recently asked me to do her makeup inspired by her look. Enjoy!
 |
| Jennifer Lawrence's makeup at the premiere of The Hunger Games |
 |
| 1) Start with a cleaned, primed eye. 2) Use a bronze cream base all over your eye. I used Maybelline Color Tattoo in Bad to the Bronze 3) Apply a dark bronze shadow all over the lid. I used Urban Decay's Smog 4) Apply a slightly warmer bronze into the crease. I used MAC Woodwinked. |
 |
| 5) Use a pencil brush and bring Smog beneath the eye. Use a dark brown at the outer third of your lower lid. Take the brown into the outer corner of your upper lid as well. If you want to go darker, use a black. 6) Apply your blackest eyeliner to your waterline (Urban Decay in Zero). 7) Line your upper lid with liquid liner. Take a smudger brush or cotton swab and apply black shadow over the liner. This will give the eye a nice, smokey look. 8) Apply a highlight color below your brow and in your inner eye (MAC Shroom). Curl your lashes and apply your blackest mascara. I used L'oreal Voluminous. |
 |
| And you're done! Pair with a nude-peach lip and you're all set! |
Tips:
This look is ALL about blending. Feel free to mix and match different bronze/brown shadows to create the perfect shade.
Take a Q-tip or smudger brush along your lower lash line to really smoke out the eyes.
Thanks for viewing!
~Beth
Sunday, April 15, 2012
Feather Manicure
I did this manicure once last summer, but it didn't turn out so well and I ended up peeling it off within 24 hours. I decided to try it again, this time with more success. It's super simple and inexpensive.

First paint your nails with a base color (I used Nicole by OPI "My Lifesaver").
After they dry, apply a thick top coat (I used OPI top coat). Take a feather (I got these in a pack at Michael's for around a dollar- the pack comes with tons of feathers too) and apply the top of it at the base of your nail. You can apply the feathers diagonally if you choose, but I did mine straight.
Press the feather into the top coat.
Take manicure scissors and snip off the end of the feather. It might take a couple of trims to get the feather close to where your nail ends.
Apply the thick top coat over the nails (going from the tip of your nails to the base as to not disrupt how the feathers are facing).
And you're done!
Tips:
You may discover that the feathers fray after a day or so, so just apply the top coat again to keep them put.
Using a thick top coat holds the feathers better than a thin one (usually quick-dry top coats are thinner).
Resist the urge to peel your nails! It will be tough because with the feather and multiple layers of top coat you may really want to just peel it off- but don't! It'll be worth it, promise :)
Thanks for viewing!
~Beth
Monday, April 9, 2012
Some Spring Ideas
Here's a few Springtime makeup and nail looks that I've tried over the past couple of weeks. I didn't have enough good pics to make tutorials out of them, but here's some ideas if you're looking to try something new :)


Tuesday, April 3, 2012
Lana Del Rey Inspired Look
I've really been digging this vintage-y look inspired by Lana Del Rey. It's very neutral and
wearable, and you can tailor it to suit your own features.
 |
| One of Lana Del Rey's looks. The look I created is inspired by her as a whole, not just this specific picture. |
 |
| First the hair. To create vintage waves, pull your hair to one side and curl as normal. When you are done, gently brush your curls and then spray with hair spray. I love how this makes curls so soft and touchable. |
 |
| The eyes are nice and simple. 1) Prime your eyes and swipe a skin-toned matte color all over your lid and up to your brow bone 2) Using a crease brush, take a taupe color and use a windshield wiper motion to apply the shadow. This is about creating natural shadows and depth, not obvious color. Take the taupe and apply under the eyes as well. 3) Create a black winged liner. You can go as extreme as you'd like, however to make this wearable during the day I'd suggest not going past your eyebrow. 4) Apply a skin-toned eyeliner (I used Stila's Kajal liner in Topaz) on your water line. Curl you lashes and apply mascara. |
 |
| Contour your cheek bones with a matte bronzer. You can also use a taupe-y blush. Stick to natural colors for that vintage feel. Line your lips with a deep nude color (I used Urban Decay's Naked). Lana is known for her plumped-up lips. For this effect, smooth out your cupid's bow with the liner. Try not to make your lips look bigger by lining too much outside your lips. You can line just slightly out though. Shade slightly into your lips with the liner as well. Take a nude lipstick (MAC in Creme d'Nude) and fill in the middle of your lips. The lighter color being focused in the center will create the illusion of fuller lips. |


Tip: Feel free to fill in your brows a bit heavier than usual with this look.
Thanks for viewing!
~Beth
Thanks for viewing!
~Beth
Monday, April 2, 2012
Alternative Peacock
I love peacock makeup. I think there's so many ways to go about it, and you can truly generate a unique look from colors inspired by those awesome birds. I saw a pin on pinterest the other day with a different take on the peacock trend in makeup. I decided to recreate this look, and here it is! I love is because the whole lid is neutral, so the color doesn't overtake the eye. This is great for day (if you're adventurous) or for night. Fun and spunky!

All products used:
 |
| From upper left: Coastal Scents 88 palettes in Warm and Shimmer, fluffy blending brush, flat shader brush, small angled brush, dense pencil brush, eyelash curler From bottom left: Urban Decay 24/7 Shadow Pencil in Electric and Delinquent, Urban Decay 24/7 eyeliners in Covet and Zero, NYX eyeshadow in Luxor, Too Faced shadow in Moon Beam, Bourjois shadow in Intense Black, Tarte Lights, Camera, Lashes! mascara. |
 |
| Use the purple liner in the first third of your lower lash line, the blue on the second third, and the green on your outer third. This provides a base for the shadows, making them much, much brighter. |
 |
| Using a small brush, apply a bright purple-pink over the purple base. If your shadows don't seem vibrant enough when you put them on, dab your brush in water to dampen it. The colors will definitely pop more. I would recommend only putting a damp brush in one corner of the shadow, because it can change the texture. Also, do not use this technique with matter shadows. |
 |
| Using a combination of two blue shadows, apply over the blue base. (Make sure to wipe off the brush first!) |
 |
| Using a combination of two greens, apply over the green base. I also used a third very dark green at the very end of the shadow to give more depth. |
 |
| Use a black liner to line your waterline. |
 |
| For the lid use a shimmery light brown. For this look I combined a light and a medium brown. I then used a bit of the medium brown on the outer corner of my eye to give more depth. Use a champagne color on your inner eyes (I dampened the brush before this to make the eyes really pop), and an iridescent cream color under your brow bone. |
 |
| Line your upper lid with the black pencil. Use a cotton swab or small brush and smudge black shadow over the liner to make it stay put, and to soften it out. Curl your lashes and apply mascara. And you're done! |
Thanks for viewing!
~Beth
Thursday, March 29, 2012
Nude to Pink Ombre
I've seen a lot of nude and pink outfits around recently, and thought they'd be a great combo for my nails. Doing this gradient is super easy!
All you need is a makeup sponge and polish. I first put on 3 coats of the nude color (Stay Neutral from mark.). I let that dry then put several drops of the pink (Fuschia-istic from mark.) on a plastic lid that I put paints and polishes on. I took the bottom of the makeup sponge and picked up some of the pink. Then I started at the tip of the nail, where the color will be most concentrated and stamped the pink on. I gradually moved inward towards the base of the nail and stopped about midway all together. I went back to the tip to make sure all the nude was covered.

 |
| Before top coat |
 |
| I used Essie Matte About You as a topcoat, just because I've been feeling matte nails recently |
Thanks for reading!
Subscribe to:
Posts (Atom)