Thursday, March 29, 2012

Nude to Pink Ombre

I've seen a lot of nude and pink outfits around recently, and thought they'd be a great combo for my nails. Doing this gradient is super easy!

All you need is a makeup sponge and polish. I first put on 3 coats of the nude color (Stay Neutral from mark.). I let that dry then put several drops of the pink (Fuschia-istic from mark.) on a plastic lid that I put paints and polishes on. I took the bottom of the makeup sponge and picked up some of the pink. Then I started at the tip of the nail, where the color will be most concentrated and stamped the pink on. I gradually moved inward towards the base of the nail and stopped about midway all together. I went back to the tip to make sure all the nude was covered.


Before top coat
I used Essie Matte About You as a topcoat, just because I've been feeling matte nails recently
Thanks for reading!

Wearable Rocker Makeup

I love doing my makeup in unique, alternative-type ways. But every time I go to youtube and search for this, I always come up with these videos titled "Rocker Chick" that are pretty much the same thing- black all over the lid, maybe cherry red in the crease, lots of black liner everywhere, and tons of mascara. But this isn't really wearable for every day, or some people (like me) don't have features that can pull off such an overwhelming look at all. So I've developed a go-to type of rocker look that is wearable during the day for those days I feel a bit edgy. Enjoy!

As always, start off with a clean, primed eye.
Swipe a cranberry colored base (I used Color Tattoo in Pomegranate Punk) all over your upper and lower lid. Bring the color up into your crease as well. This will help the colors stand out more.
Choose a medium-bronze brown color (I used Smog from Urban Decay) and apply all over your lid.
Use a red shadow (I used NYX in Cherry) very lightly in the crease.
Take the red to the lower lash line as well.
Use a cranberry pigment (E.L.F. in Magical Maroon) in the crease and lower lash line as well. If you apply it too dark, use a clean blending brush and blend until you have your desired effect.

Use a matte white eyeshadow to highlight under your brow bone and inner eye. This is subtler than a shimmery highlight, because enough is going on with the red tones. 
Use a medium-dark brown (or black if you have dark features) eyeliner and line your waterline and upper lid.
Curl your lashes and apply mascara.
(sorry for the random line in the pic!)
Contour your cheekbones with a matte bronzer. Apply a peachy blush to the apples of your cheeks.
Use a nude lipstick (Soft Nude from Revlon) and you're done!

I like this looks because it's unique in that you use reds, but they do not overwhelm your face or make you look like your eyes are bloodshot (always a plus haha). Using brown liner instead of black makes the look softer, but using a medium brown on your lids and lining the waterline still looks edgy. Hope you liked it!

Monday, March 12, 2012

Dip Dye

The other day I decided to dip dye my hair for the second time. The first time I did it I did an ombre from yellow to red. This time I wanted to do purple, and bought purple dye, however it turned out mostly blue on my hair. I still like it though- I just hope it doesn't turn green after a while.
My hair the first time I dip dyed it red
Blue-ish indigo hair
How To:

I don't like the look of dip dyed hair that isn't a little ombre. To do this start by mixing a bit of hair dye with conditioner
This way you apply the conditioner and dye a bit above where you would like the intense color to start and it's a nice transition into the brighter color. 
Clip hair into sections and apply the dye. I did quite a few layers with the blue. So first I did all of the hair I wanted color with the most watered down dye (or conditioned down dye).  Then I washed and dried my hair. Then I added more dye to the mix and applied it a bit lower than the other dyed hair. I repeated this process until I used just dye on the very ends of my hair. 
I have a section of hair that I bleached last year that picked up the color a lot more than the rest of my hair
After a couple of dyes...

After I dried my hair after the last application of dye
After straightening

This process took about 3 hours because of how many times I had to apply dye, wash it out, and dry it. But all in all I think it looks better than a stark line of color.

When I dyed my tips red I did the same process but I started with yellow then mixed yellow and a little red, then more and more red until the ends where just dyed red.


Friday, March 9, 2012

DIY nail polish rack

Who says a nail polish rack can't be pretty?

I was intrigued when I saw a homemade nail polish rack on youtube made out of wood, so I continued to look up ways of making one. On Amazon nail polish racks can easily cost over $50, but this cost me about $16 and is completely personalized.


How I Made It:
The basic supplies you will need are 3 styrofoam boards, hot glue (and lots of it),  an x-acto knife or pair of sharp scissors, ruler, super glue (optional), and a pencil.
Start by choosing what pieces will be what. You will need one to be a backboard, one for the shelfs, and one for the casing around the rack. 
Take the backboard sheet and measure where you want the shelves. Mine were about 3 1/2 inches apart, but after I was finished some of the shelves seemed a bit small, so I'd go with 4 inches to be on the safe side.
Then take the sheet you will use as shelves and measure out your shelves. Mine are about 2 1/2 inches. Take the casing sheet and measure the two long sides for the side casing (you can use 2 shelves as the upper and lower casing).

Here are my pieces before I put them together. To assemble the rack, place hot glue alone one side of each shelf and place it on a line where you measured the shelves would be. Then glue on the outer casings. You can reinforce the shelves with superglue if you'd like.
I left a big space at the bottom to fit polish remover and other large items

Next to make it pretty. I decided to use a bunch of scrapbooking paper in a collage type pattern
After a couple of shelves
After I was done with the background, I wrapped black paper around each of the shelves
I also added some fun decorations
With the polishes! All together this took about 5 or 6 hours. I love how this is really personal to me- and it was cheaper and prettier than a rack from online! I think I am also going to add some lettering on top that says "nail station" or something of that nature. 

Hope you enjoyed and feel inspired to make your very own nail polish rack!

Thursday, March 8, 2012

Ombre First Attempt

So, this was my first attempt at a vertical ombre of this nature. I've done where each separate nail gets light, and I've tried vertical ombre using a makeup sponge, which turned out alright, but I wanted to try a different way. So here is the result

(Pre nail cleanup :])
First I painted the whole nail in a mix of the Nail Envy and yellow. Then I painted a strip above that with yellow mixed with a little bit of the mango color, then increased the amount of mango color. Eventually I used the mango color mixed with a little of the burnt orange color. I topped it off with Ulta X-dry. 
I'm not quite sure how I feel about it yet. It definitely looks better from far away, because up close you can see the lines of the colors. Next time I'll probably try a different method. 


From left to right: OPI Nail Envy Matte, Zoya Pippa, China Glaze Papaya Punch, China Glaze Street Racing, Ulta X-dry

Drugstore Everyday Eye- No Brushes Required!

This look is simple enough for every day, but if you want you can slide on a heavier liner to make it perfect for evening too. I used Maybelline Color Tattoos- so you don't even need a primer. I like this look because it's soft enough for every day, but at the same time a bit unique. Enjoy!

Start off with a clean eye. You do not need a primer for this look, however using a primer will keep the color more vibrant throughout the day.
In this look I used Maybelline Color Tattoos in Tough as Taupe and Pomegranate Punk
Swipe the taupe color all over the lid and with your pinky finger bring in to the lower lash line
Take the pomegranate color and dab it on the outer third of your lid.  Again, bring this down to the lower lash line, also on the outer third

Take a matte medium to dark brown on a cotton swab or small brush.  Here I used a color from a NYX trio 
lightly line your upper lash line and lower lash line with the brown


Add mascara and you're done!

If you want to transition this look to nighttime, line your upper lash line and waterline with black

Tuesday, March 6, 2012

Makeup Brush Essentials

I have gotten a couple of requests to do a post all about brushes, so here it goes. I will be using e.l.f. brushes as an example because they are extremely affordable and have some fantastic options. They are available online or at a lot of Targets (but not all). Most makeup junkies will tell you to invest in good and expensive brushes, like ones from MAC. But, I am a college student, and at the moment cannot afford $20-40 brushes, and am quite pleased with the ones I own as of now. Another good place to look for professional-grade, cheap brushes is Crown Brush (they manufacture for a lot of companies that have the same brushes but jack up the prices). The only thing about Crown Brush is that you have to make an order of at least $30. Ecotools is another great brand with affordable brushes.

There are MANY other kinds and shapes of brushes out there than those I am mentioning- I am just talking about the essentials, or what kinds of brushes you should buy if you're just getting into makeup

FACE

foundation brush
Flat-top dense brush
Standard Foundation
                                         
There are many diffferent brushes you can use to apply foundation. To the left is a standard foundation brush. It kind of looks like a paddle- it's great for applying foundation evenly. 

                                                               
Stippling Brush
Other options of applying foundation include a stippling brush and a flat-top dense brush. The stippling brush will apply foundation (or whatever you choose to apply with it) lightly, while the flat-top brush will do the opposite. It gives you heavy coverage, and is one of my favorite brushes to use when I'm breaking out or have a lot of redness. 


Blush and Powder


Standard Blush Brush           
Angled Blush Brush

A stippling brush can also be used for blush (pictured above). Other brushes are your standard blush brush, which is round and soft to blend your blush. Another is an angled blush brush, in which the bristles are angled to glide more naturally along the angles of your face. 

Powder Brush
Kabuki Brush
For finishing powder, you can use a dense flat-top brush like the one above, a large powder brush (usually looks like a blush brush just bigger), or a kabuki brush. All of these have denser bristles and a wide area to gentle sweep over your face. 


EYES

Eyeshadow

Blending Brush
Paddle Eyeshadow Brush
There are really hundreds of kinds of eyeshadow brushes, so I will just be highlight some essentials. First is a dense paddle brush. The denser the bristles, the better the brush will pick up color. This is for packing color onto the lid.  Another brush is a blending or crease brush. It has fluffy, yet somewhat dense bristles. It places color into your crease and blends in your shadow so there are no harsh lines. I believe one of the keys to a good makeup look is proper blending. 


Pencil Brush


It is also good to have a pencil brush, which is named for its shape and purpose. It is precise, to "draw" color in small areas, like a dark color at the very corner of your eye, or to sweep shadow underneath your eye. 
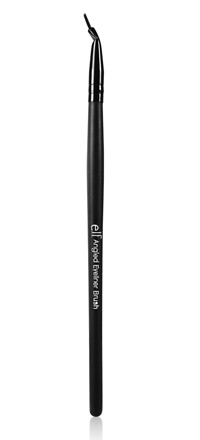


eyeliner

Angled Liner Brush 1
Angled Liner Brush 2
For eyeliner (and brows!) you need an angled liner brush.  A good one will be thin (I actually do not suggest the e.l.f. one for eyeliner but it's great for brows- the pic just shows you the shape to look for. Try ecotools for a great angled liner brush!) and will give you control.  (Left)          Another eyeliner brush essential is another type of angled liner brush, only this one looks like a small paint brush that some came and bent the top of. This is fantastic for gel and creme eyeliners, because you can actually see the line you are making every stroke of the way. (Right)


LIPS

What I have found is that often I do not use lip brushes on myself unless it is a bright color and I need precision. In that case, I turn to Angle Liner Brush 1 found above. The angle gives a nice edge of the lipstick. Other than that, there is the standard lip brush. It looks like a a small painting brush. 


Well, those are what I would call the essentials of makeup brushes! Thanks for reading!
~Beth